
 Review by Jim Lincoln
You see them everywhere in our modern world. In fact, if you live in any sort of civilized area it is hard to escape the “double T.” What I am referring to is the “Double T” (TT) method of precast concrete construction. It is commonly used in bridges, buildings and, in particular, parking garages.
History
While we might think that the use of concrete is a modern phenomenon, in fact, the Romans were the first to employ its use. The development of and use of pre-cast concrete components is not all that modern either. The process was pioneered in Liverpool, England, in 1905. The process became popular in Europe, but it did not gain acceptance in North America until after World War II. The first bridge constructed from precast, pre-stressed members was the Walnut Lane Bridge, built in 1949 in Philadelphia, Pa.
Since that time the use of precast concrete has become quite common. If we drive into a modern industrial park, we will generally see three types of buildings: those sided with metal/steel, those with steel frames filled in with concrete blocks and those built with tilt-up precast concrete panels. If we look at virtually any parking garage that has been built within the past 30 to 40 years, it is probably built out of concrete with double T precast panels used as the floor/decking. It is also relatively common to see double T beams riding on long flatbed trucks on their way to a bridge construction project.
While the double T is widely popular for constructing decks or horizontal surfaces due to its tremendous strength, if one takes a drive around their local industrial park as I did, you will not find too many structures built using double T panels for the walls. That, I realized, was because the industrial parks in my area were constructed in the 1990s and later. If you go to an area that was built in the late 1960s and ‘70s, you will find these types of structures. With advances in technology, apparently it was determined that the incredible strength of the double T was not needed for a vertical panel. This does not mean that double T panels cannot be used for wall construction, just that they are not as popular now.
The Model
Pecos River is producing a new line of modular structure kits featuring the double T precast panels. The Double T (“TT”) Line complements their existing Modular Structure (MRS) Line of kits. The TT Line is made up of 15 different kits varying in price from $25 for a simple building flat to $125 for the 32’ tall Locomotive Maintenance Facility. Each kit includes different combinations of wall components, as well as windows and other details. The individual wall components, as well as the rooftop details, are also all available separately; although at the time of this writing, the 32’ and the 12½’ wall components are not yet available on the Pecos River website. They do come in the kits, however. The kit we will be looking at is called Richard’s Guitars.
The reason I keep referring to the Pecos River TT models as kits is that really they are just collections of building com-ponents, and the included instructions say as much. These may be assembled in whatever configuration you want and the diagrams included are only to give a suggestion on how the components could be assembled. For that reason, the instructions are quite general. In fact, the first thing that I noticed when I opened the box was a 3×5 card with the following instructions: “DUH! The walls are styrene. Use glue.” There were also some diagrams helping you to iden-tify which part is which as the numbers are not cast onto the parts themselves, as well as a diagram showing how the parts could be assembled. Lastly, there are some instructions on how to build a set of concrete stairs if you are using a wall section with a personnel door that is above street level.
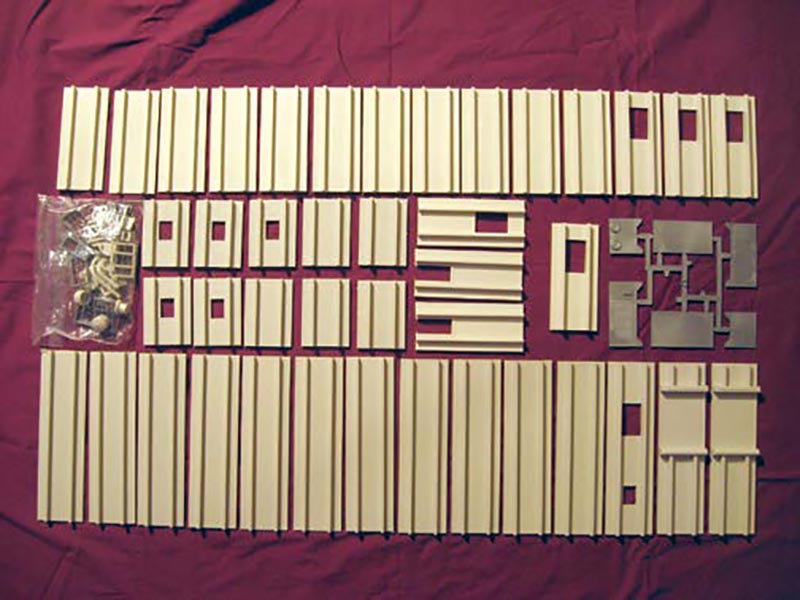
After sifting through what little there was of the instructions, I set about checking out the parts. They came packed on their sides in the box, along with a bag of detail parts. These include the windows and quite a selection of roof vents and sprues for a rooftop air conditioning unit. There are no signs included with the kit. There is also no acetate included for window glazing. The walls filled the box with very little extra space inside, definitely different from the HO plastic kits that I have been used to. The walls are made of heavy styrene and are about 3/16 thick, so the box had quite a lot of heft to it. I laid out the parts for a photo (Photo 1), then I put them back in the box and got to work.
Construction
As I progressed through the construction of this kit, I realized that although the primary instruction (“DUH”) gave me a chuckle at first, assembling these walls is really that simple. The walls are extremely nice castings and, for the vast majority of this structure, the only tools I needed were a straightedge, an 8” mill (bastard) file to clean up the edges of the panels and my cement. The instructions suggest using tube type cement, but I used liquid type (MEK, Tenax 7R, etc) as it sets almost immediately. The plastic in the wall panels varies in thickness slightly, but because of the TT construction, the bottom parts of the T’s (the outside of the wall) are all the same depth. I laid the panels face down with the top (there are ridges to hold the roof that indicate which end is up) along the straightedge. This has the advantage of forcing you to apply the cement on the inside of the panels so you will not mar the surface.
The walls went together easily and if you use copious amounts of cement as I did, the resulting walls are extreme-ly strong. This was illustrated when I dropped an assembled wall onto our ceramic tile floor while I was standing. The result of that was that one of the joints had cracked (only part way) with no visible damage to the panels at all. As I said, these walls are very stout. Having done all of my struc-ture building in HO previously, I was accustomed to having to brace the inside of the walls for strength. I was expecting to have to do the same thing here but it is not necessary. You might want to put something on the back of the walls to keep them straight, but it really is not necessary if you cut your roof panels square and possibly include a floor. That will straighten out the walls for you.
A roof is not included with the kit, but as the instructions state, it would not fit in the box. I used 0.040” styrene for the upper roof, which I supported with a Plastruct I beam underneath. For the lower roof I used 3/16” foam core board to make sure the short wall panels would touch the roof.
Since there was no acetate included with the kit, I used Gallery Glass to glaze the windows and found some scrap acetate for the doors. The only time my Xacto knife came out was when I had to assemble the air conditioner, which, while easy to assemble, will require some tinkering to ensure a tight assembly. The rest of the detail parts could be cleaned up with the mill file.
Since the walls are smooth styrene, I primed them with cheap spray primer from Wal-Mart ($0.97, for the “Color Place” grey primer). I then brushed on some textured paint to give the walls a more concrete feel. After painting the roof vents, I placed them in their appropriate locations and the structure was essentially complete except for detailing and weathering.
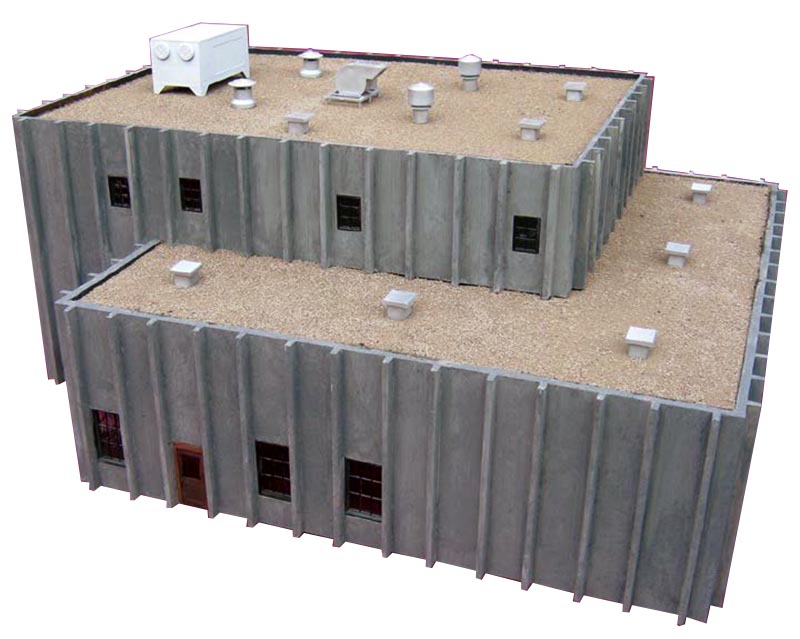
One of the benefits of this system is that you can assemble the wall panels in any configura-tion that you wish. I was originally going to build this the way it was laid out in the instructions but since I am keeping this structure and it is going on my layout, I did change the placement of the wall panels to reflect what I was going to have this structure be: a chemical company. I figured that the office would be in the front corner, so I grouped the window and wall panels together in there. A small modification, but it was easy to do.
Conclusions
All in all, this was an easy structure to build and it is extremely strong. The panels are molded well and the initial instruction of “DUH, just use glue!” is spot on. The completed structure really captures the look and feel of the prototype (Photo 2).
Perhaps my one complaint about the structure is the lack of any prototype information or a photo. Now one might say, “But this is just parts, it does not have a specific prototype!” While that is true, the style of construction does follow a particular prototype and if a prototype photo had been included, it would have been helpful when painting the structure. I spent a lot of time filling in the seams between the panels, since I had not seen one of these structures close up. Once I had seen one up close, however, the seams are readily visible. Even a sentence in the instructions stating: “Don’t over think this, there is no need to fill in the seams; you can see them on the prototype.”
In addition, a prototype photo would have shown that since these panels are pre-cast, they use smaller aggregate and thus have a smoother appearance that is different from cast-in-place structures. It actually would have saved me a lot of time trying to either fill in the seams or recreate the texture. In fact, these kits are even easier to build than I made it.
The only other small problem I found was that the large window openings on the 20’ high walls was not square: they form parallelograms, not rectangles. The problem is only slightly noticeable, but I am a bit of a nitpicker. The windows will fit in the openings with a little bit of extra filing and perhaps it is only a problem with the walls that came in my bunch as the large window on the 32’ wall were square.
These kits are definitely worth the money and are really easy to build. It is definitely a structure that will stand out on your railroad if you model the late 1960s up to the present day.
Double “T” Tilt-up Building
Kit #TT2304 Richard’s Guitars; MSRP: $90
Pecos River Brass
290 W. Lake Park Road #810
Lewisville, TX 75057