
 Review by Martin Brechbiel/photos by the author
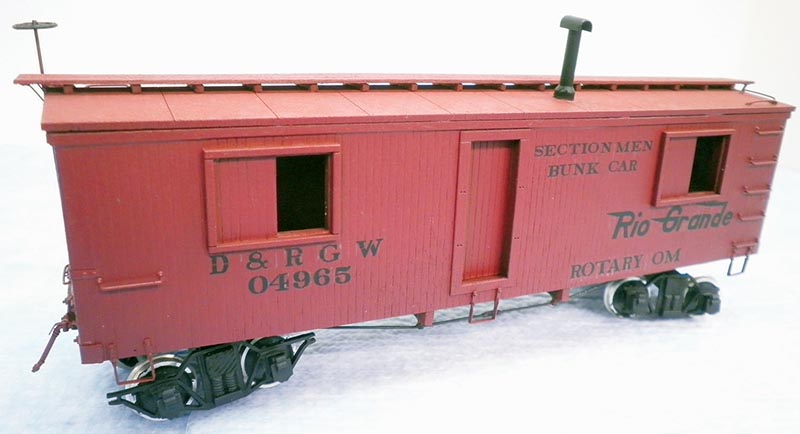
Leadville Designs bills itself as “a boutique supplier of finescale models.” When confronted with an opportunity to build one of their kits, a maintenance of way car, there was no hesitation on my part. This car, Rio Grande 04965, was originally a 30’ boxcar in the 4000 series. In 1914, D&RGW started converting these lower capacity cars into MOW service. The 04965 was a bunk car that eventually was part of the Rotary OM train and still exists today.
The kit is comprised of laser-cut wood, plastic castings, etched brass parts, wire components, and 3-D printed details. Full lettering is included for both pre- and post-1941 paint schemes including lettering as used in the Rotary OM service train. There are also some very useful and noteworthy instructions included. These provide a parts list, information on working with the 3-D printed parts, an identification diagram of the etched brass parts, a color coded diagram of wood parts, step-wise building instructions, and a set of scale plans. I scanned that last page in and printed off a copy to have in front of me while reading instructions. Seeing what you’re reading about at the same time in-stead of flipping pages about helps a lot. But take some time here to identify all of the parts and read through the instructions a bit before starting. There’s no good reason to make mistakes here using the wrong part in the wrong location.
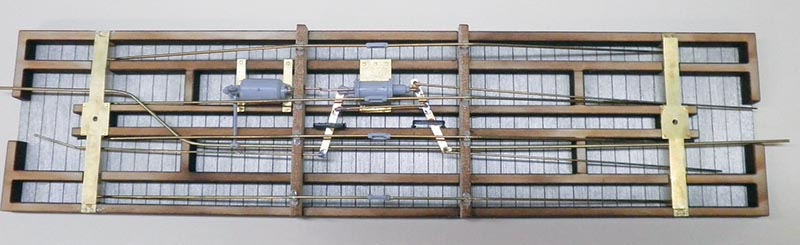
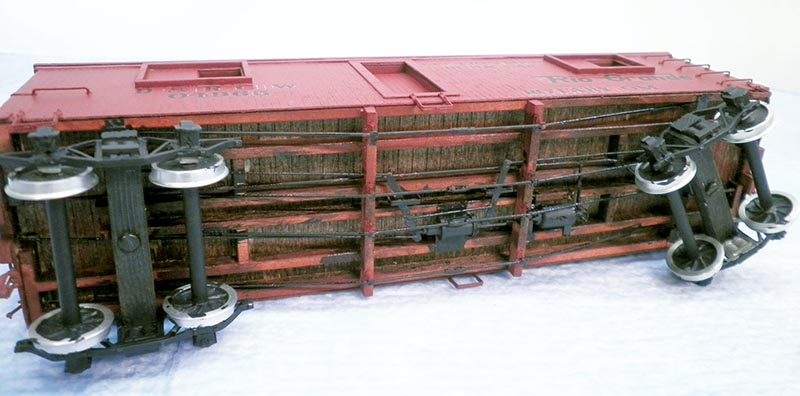
I generally followed the instructions. It pays to read and keep close attention to both the instructions and the markings on the laser-cut parts as they define an up and down side. The underframe parts have etched markings on them that define where the parts go that get mounted to the underbody. Do not glue these upside down! There are many instructions for installing the brake system on this car that direct you to build and shape parts off the car underbody and then install them. I found that a bit cumbersome and worked this differently, locating and installing the split K brake cylinder parts onto the etched brass supports so I could use those components and the carbody to better visualize where (and how!) all the parts fitted together.
Then it was just a matter of installing all of the linkages and levers, remembering to work around the needlebeams and also remembering to orient those needle-beams properly so that the brake rods would pass through the apertures cut in those parts for that purpose. Again, one has to look at these parts carefully as the train line also passes through them. I soldered a few of the lever linkages as these tended to be a bit floppy, leaving too many parts free to wander about during assembly. Forming the connection between the two brake components going about the one needlebeam was a test of patience and manual dexterity with small hemostats, but if I can do it successfully, then I know it’s achievable for others.
I also added a pair of brake lever brackets (old stirrup steps) for good measure. So, the brake system installation is extensive and looks great once completed, but it may or not be too much for some. I’d still recommend tackling this stage completely as working through it is both rewarding for the modeler and adds a lot to the model.
Adding the queen posts required drilling the needlebeams. The queen posts are 3-D printed and are a little slippery. Handling them carefully so they don’t fly off into space is recommended. The truss rods are formed from 0.025” wire. These have to be formed not breaking the queen posts while connecting them together with the supplied turnbuckles. The truss rods do not run out to the end sills in this model, but just disappear under the bolsters. While perhaps not optimal, the final appearance looks just fine. The bolsters are straightforward and built up from the etched brass parts.
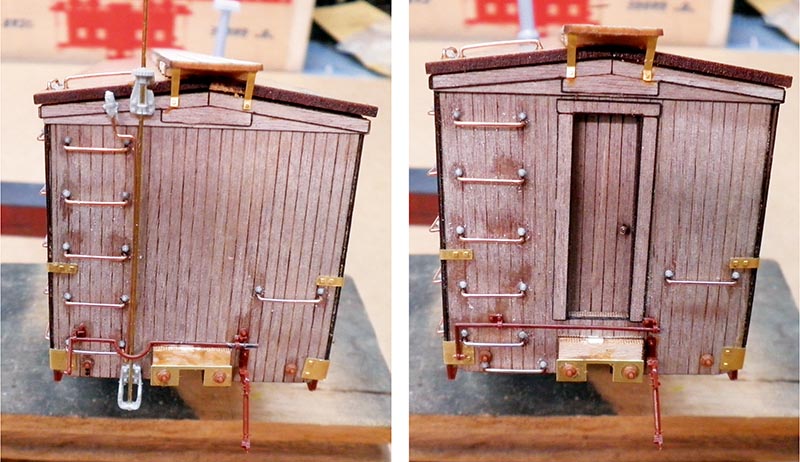
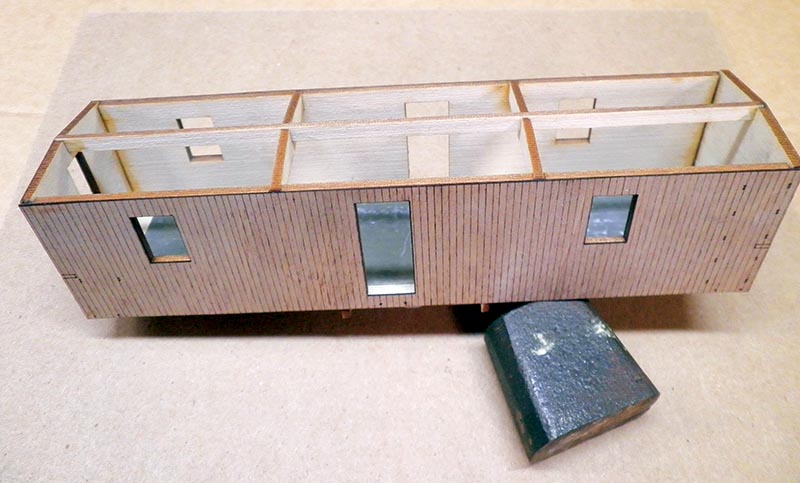
Assembling the walls and ends again requires one to be attentive to which walls and ends go where, versus the location and direction of the brake cylinder. There are inner and outer walls that get laminated with extended sections for overlap at the corners. Getting these properly aligned is critical and make for a very solid carbody once assembled. Once set, adding the rest of the exterior detail goes fairly quickly. You do want to hold off on actually placing the windows until after they are painted and glazed, and the rest of the car is also painted.
I did note a few errors along the way that I suspect crept in from instructions for a different scale car. These all pertained to recommended drill sizes; when you look at what you are drilling a hole for, these errors become quickly apparent and also easily corrected. Just measure for what you need and go forward. There are a lot of holes to drill for all of the grabs and stirrup steps, and then all again for the NBW castings that go with every mounting point for these parts. The NBW castings are also rather small, so good tweezers, good lighting, and patience with the fine tip end of the CA bottle are needed.
I particularly like the roof assembly with laser-cut roofwalk supports that drop into slots, pre-fabricating all the alignment. The etched brass parts were also rather nice, and useful in general, and something I’d buy a few sets of if they’re available for purchase. There were only two prob-lems encountered, both pertaining to the grab irons. There was supposed to be a bending jig set of holes in the fretwork of the etched brass sheet, for bending the wire to make the grabs. That was missing, but not a big deal as where the grabs go is well marked by laser dimples, so bend to match and move on. And that leads into a somewhat bigger issue. I ran out of wire after placing the truss rods and the brake rigging. Maybe the amount included was for a smaller scale car, but it’s not like brass or phosphor-bronze wire is in short supply so this posed no impediment for me.
Adding all of the brake end details really fills up that end of the car. After adding the lift levers, end blocks, and other details, the ends look very sharp and complete. Pant and stain were then added, using wood stain for the underbody after the components there were first blackened with some Steam Black. The rest of the car was painted using some red primer from the old rattle can, lightly because there are some fine laser-etched roof details. Thereafter, some Scalecoat Boxcar Red was oversprayed to push the tint a bit and to add gloss. The windows were painted in parallel (Boxcar Red), glazed, and installed. The kit’s decals were nice and smooth to apply. I dropped the car onto a pair of small standard gauge trucks for photo purposes, not having On3 trucks or couplers in my shop. I rather like the look and can see the appeal of this car; perhaps I could have lettered it for Tuscarora Valley.
Overall, this was a well designed kit with some of the better instructions and parts information that I have encountered in recent times. The mix of materials works well to build a sturdy, yet smaller car that will look good on the layout. I think all of those criteria make for a very buildable and fun kit.
Leadville Designs
On3 D&RGW 04965
MOW Bunk Car
MSRP: $84.95