

 By John Sethian/photos by the author
February 1, 1968: The Pennsylvania and New York Central railroads merged as Penn Central. The aftermath was not pretty. Nine and one half months later I was headed home to Washington, D.C., for Thanksgiving break. The latest excuse for a passenger train pulled into Trenton station, some four hours late. The GG1 radiated a fragrant bouquet of overheated insulation, leaking steam pipes, and dragging brakes. Two hours later we had made the 30-mile run to Philadelphia. As the train left for Wilmington, the young lady standing next to me politely asked the conductor: “Sir, when will this train arrive in Washington?” His reply: “Ma’am, I don’t know. They took away our watches long ago and just issued us calendars.”
After that and a host of similar experiences, I haven’t a clue why I like trains at all, much less spend my free time on them. I feel like Richard Dreyfus’ character in “Close Encounters of the Third Kind.” Instead of inexplicably carving a faithful replica of the Devil’s Tower out of mashed potatoes, I am modeling a faithful replica of GG1s roaring through southeast New Jersey.
Modeling Inspiration
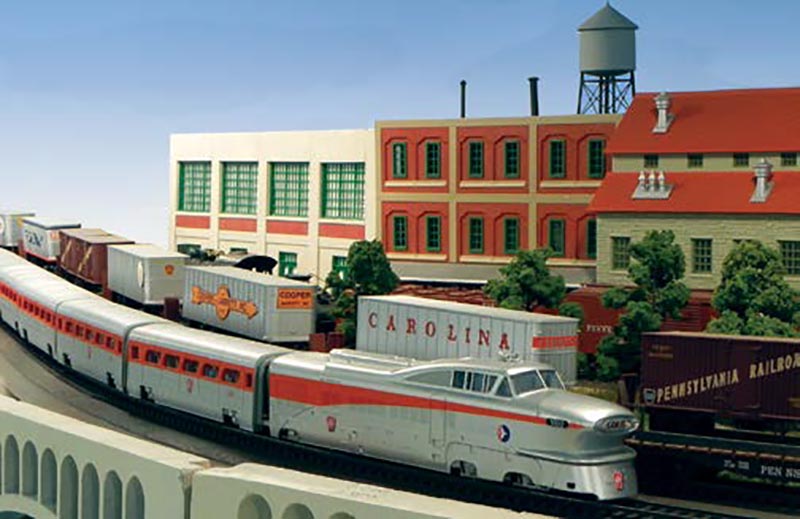
Well, not quite that faithful. A better description of my fictitious PRR Nassau Division follows the electrified Northeast Corridor through New Jersey circa 1956. The sole purpose of my layout is to allow me to be the kid by the tracks watching trains appear in the distance and shake the ground as they roar through one of six scenes: a typical Northeastern city with trains leaving under the shadows of large industrial buildings; a stone arch bridge crossing the Schuylkill River; the high-speed four-track main through Princeton Junction (hence the layout’s namesake); and Griff Teller’s rendition of “The Trenton Cutoff,” along with and finally, the South Amboy engine servicing facility.
While the layout may not hold to the prototype, my trains do. If it ran on the Corridor in 1956 I have it. That allows me to run many of the memorable heavy electrics that graced the rails of the PRR like a trio of P5as, MP-54 commuter trains, and of course, GG1s of all colors and stripes. Eventually I’ll have a pair of those brutish looking E2bs. I also have the local to Red Bank pulled by K4s, a lone BP20 A-unit downgraded to com-muter service, and even the Aerotrain.
Also modeled from the prototype are all those signature Pennsy architectural details: position light signals, post and cable highway fences, hairpin station fences, pipe railings, and elevated suburban station platforms supported by ivy covered stone block walls. And of course there’s that catenary. The supreme compliment came from a non-railfan visitor, who exclaimed: “Hey, this looks like New Jersey.”
The Layout
I designed the layout with RR Track software, but then built a 1/12 scale model to make sure there were no surprises, particularly with viewing angles. There were quite a few (it’s tough to visualize things in 3D), so I am very glad I did this. The minimum radius on visible mainline curves is 54” and hidden curves are 48”. Most curves are over 57” and a few are over 200”. The minimum radius on the innermost storage track under the city is 36”. The mainline is double tracked, 110’ long, and roughly “L” shaped with a 20-foot section of four high-speed parallel tracks. A 110’ branch goes to a hint of an engine terminal, a double tracked branch line, and two hidden storage tracks. But its real purpose is to provide an excuse for four tracks to disappear into three cut stone portals under the main. In other words, vintage Pennsy!
Designed For Railfanning
At first blush the track plan with three independent con-tinuous loops may look like a glorified Christmas layout. But I think nothing beats watching trains pass each other, go over one another, and even overtake each other. The plan sacrifices length in favor of a more visually open design with ample aisle width, relaxed scenes, and, as a side benefit, more room for visitors. Incorporating this into what is admittedly a fairly small space meant I had to give up many current layout design prac-tices such as a yard or a meaningful engine servicing facility and hidden staging tracks, at least in the classical sense. I can store five trains in sidings under the city and another two off the branch line. There are no formal operations. A train comes out of one of those sidings, makes a few circuits, and goes back in.
The train-watching objective not only drove the design of the track plan but the layout room itself. I have the usual scenic viewblocks such as tunnel portals, buildings and trees but I also tried to ensure that when I look down the track I couldn’t easily see the ceiling, the floor, or even the front fascia of the benchwork. The fascia is at a constant height and mostly well below track grade. This allows for viewing and photographing over long distances without having an unrealistic profile board sticking into the view.
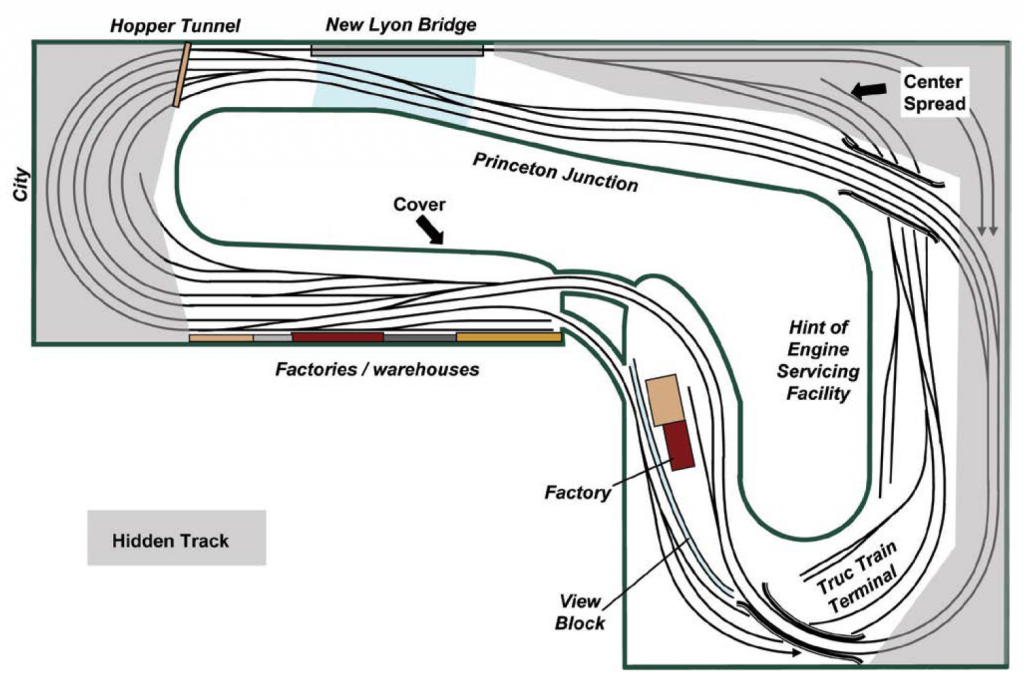
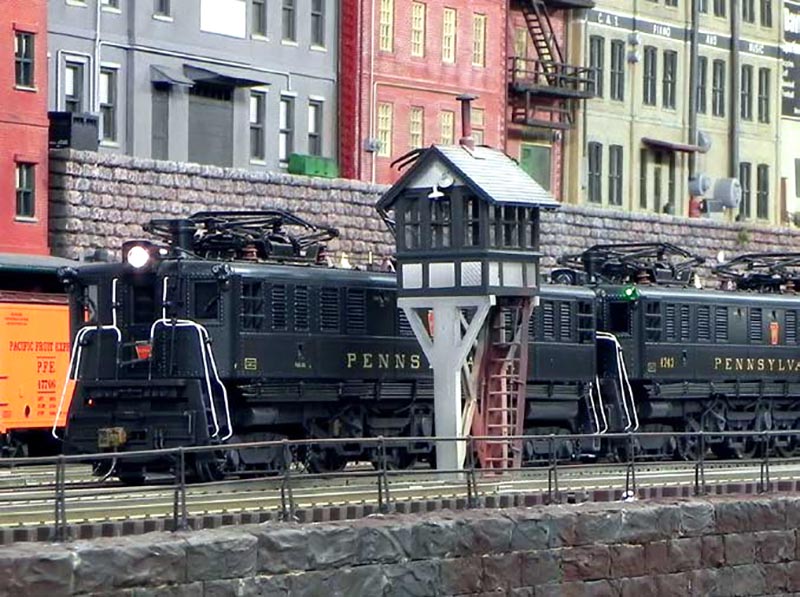
A typical PRR mainline elevated suburban station in 1956. The stone wall was made by sanding down Scenic Express Pennsy cut stone walls. The bridge girders are from Lionel, and the hairpin station fence is made from square brass tubes and wire. Shortly after the fence was completed Atlas offered an etched brass version. While not as realistic, it would have sufficed, as it would have been a lot less work.
Both walls and ceiling are painted to look like the sky, with coved vertical corners to avoid a sky with a square corner in it. I have wide aisles so you only see one length of track and the track is placed away from the edge of the table when possible, allowing for ample scenery in front.
The duckunder is a major one and requires stooping under three tracks about 54” high and 36” apart. I installed handrails on the sidewalls about two feet off the ground. These make going through the duckunder very easy. I continually poll my visitors about this. So far everyone says the handrails makes the duckunder workable.
Construction
The layout construction is L girder with 1×4 poplar and pine. I installed adjustable levelers under each leg to make sure everything is the same height, which will allow carpet instal-lation when I am further along. I have a ¾” thick 13 ply plywood sub-base, held by risers on 16” centers (strong enough to dance on). I glued 1” pink foam on top so I can have scenery below track grade. The roadbed is precut, 3/8” Homasote on the main, and either ¼” foam or nothing on sidings and spurs. The fascia is made from 1/8” Masonite hardboard and is curved to define the edge of the layout. The underside is open. I real-ize I am giving up prime storage area but I prefer the spacious look of floating benchwork.
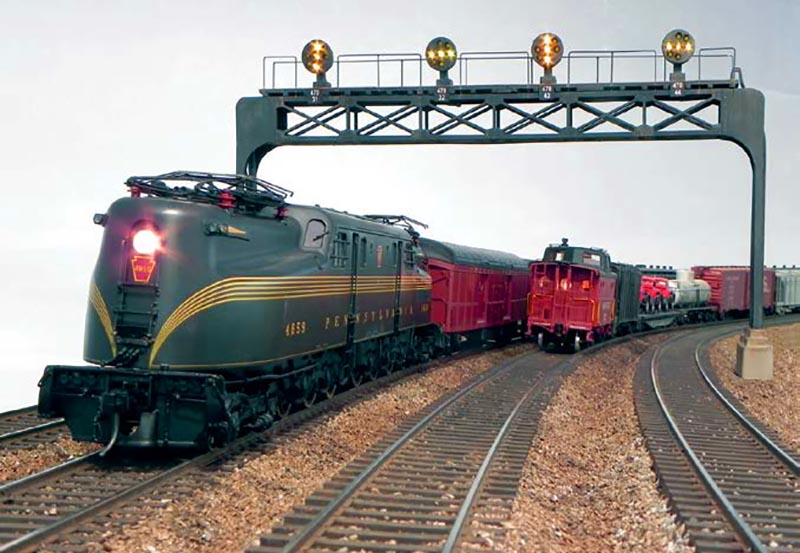
Superelevated curves are a hallmark of the PRR main line. The signal bridge is made from two MTH bridges. The signals indicate the alignment of the turnouts ahead. The lack of overhead catenary is obvious in this scene and others. The author will be including overhead wires in the coming months.
I use Atlas track exclusively as it is very easy to work with. Among other things, you can easily slide a rail along its length, which allows staggered joints on curves. All visible curves are superelevated. I laid the track first, and then slipped a half piece of N Scale foam roadbed under the outer edge. At 1/8” thick, it’s a prototypically correct 6” high. Much to my amazement, the slope of the N scale roadbed matches O scale roadbeds, so you get a smooth transition. I have vertical easements for the superelevation, and of course horizontal easements for all the curves. With this approach I have never had a tracking problem in the superelevated sections, even with MTH I1 Decapods with unsprung drivers running on 54” radius curves. My turnouts are also Atlas (mostly No. 7½), with the points wired to the stock rails and thin plastic inserted into the frog gaps. As has been pointed out, these switches have issues. As my skills progress I may start replacing the more promi-nent turnouts with home built ones. At least that’s my current excuse for not ballasting the track.
I have ballasted a few sections of track. I follow conventional techniques, except I substituted Woodland Scenics # C1204 Latex Rubber diluted 50:50 with water instead of the conventional white glue. The latex is flexible so the resulting roadbed is very quiet. The rest of the ballast will go in after the catenary. And of course in addition to ballast and catenary, there are always the tasks of weathering cars, adding people, signs, interiors, scenery and many details.
Controls and Wiring
I control my locomotives through the DCS system devel-oped by MTH. That means all my engines have been convert-ed to PS-2. I like the 2-way communication that lets you know if the locomotive has heard and is responding to your com-mand and the large LCD screen on the remote eliminates the need to memorize anything. I use Tortoise switch machines to activate the turnouts and control the frog polarity and they are controlled with Radio Shack electrical switches. In some cases, classic Pennsy position-light signal lights indicate the switch-point position. Not quite prototypical, but it does prevent ugly, embarrassing events. All my wiring is labeled and color-coded. I am told it’s compulsively neat.
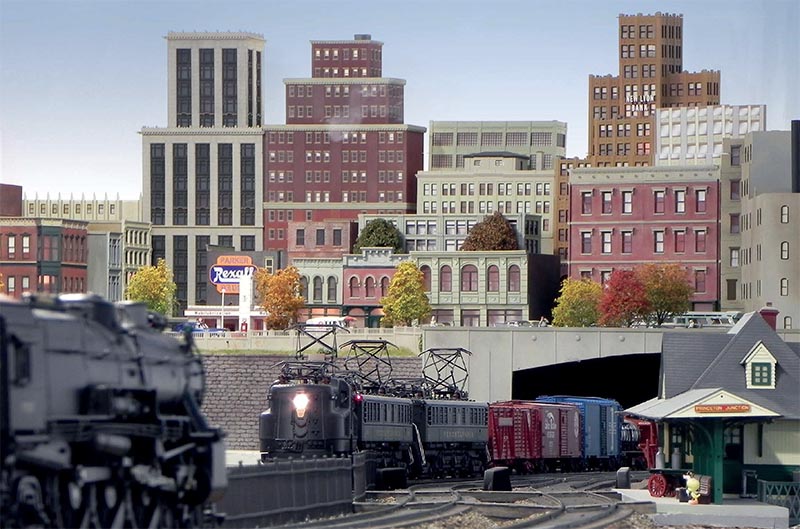
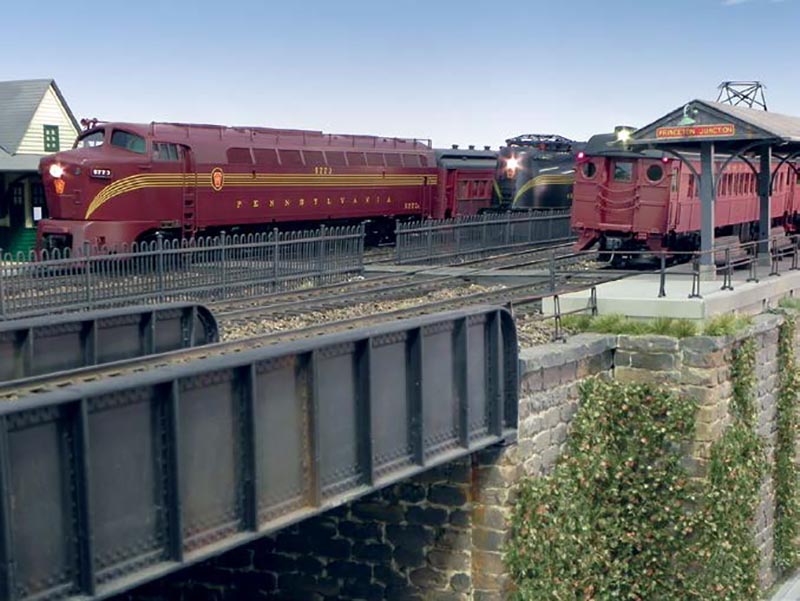
Freight trains pass at Princeton Junction. Some of the distant city buildings are HO scale to create a forced perspective effect.
Locomotives and Electrical Pickup
I convert a lot of my locomotives from 3-rail, particularly if MTH makes the exact model I want. The Aerotrain (see Issue #53 O Scale Trains Magazine) and the P5as were done that way. Most of my conversions were straightforward, but extend-ing the handrails on the two MTH P5a boxcabs so they went down the steps stressed both my modeling capabilities and my patience. Joe Foehrkolb of Baldwin Forge & Machine does the driver conversion, but I do everything else. I am a great fan of plunger type electrical pickups. They continually apply the right contact pressure and have proven quite reliable. I make mine from #16 brass escutcheon pins inserted into brass tubes with NWSL heavy driver springs providing the pressure. The tubes are soldered to a printed circuit board, which is then held to a suitably fixed object, such as the gearbox cover screws or the 3-rail pickup roller. I have converted virtually all my locos to this arrangement, even those that were born as 2-rail.
I can’t stand flickering passenger car lights, although arguably they are prototypical for the Penn Central in 1968, so I converted all my passenger cars to through-the-bearing pickups. My solution is to electrically tie all the cars together, bringing the wires out through the diaphragms and using JST plugs and sockets to easily connect/disconnect the cars. I also use resistor strings to dim the lighting so it doesn’t overwhelm the building lights at night.
Two P5a Box cabs converted from MTH 3-rail models. Modifications included adding a full length fixed frame, filling the gaping coupler holes, adding extra steps, and extending the handrails to the bottom of the steps.
Scenery
My buildings are either scratchbuilt or kitbashed. I find that MTH buildings can be converted into very realistic structures if one uses Grandt Line castings to replace the unrealistic windows and add a few details. I use slightly taller HO Scale buildings in the background to force the perspective. For example, the New Lyon Bank in the centerspread is made from nineteen HO scale City Classic Art Deco Buildings. The modified MTH corner store and the building to its left in the foreground of Photo 7 are other examples of kitbashed buildings I used. A trick I learned from Dennis Brennan is to leave a 6-inch or so gap between the backs of the buildings and the sky, and to light the sky with hidden 20W fluorescent lamps. This really enhances the effect of distance. The other nearly finished scene is the array of tracks leaving the city under the shadow of towering factories. Again all the buildings are either scratch-built or kitbashed. Most have photos of offices or industrial machinery inside the windows.
All of my buildings are lit. I mount the bulbs on the back of the front wall where they can’t be seen. I vary the color of the illumination between buildings, and even within a building. To accomplish this I use different bulbs and vary the voltage by adding resistors in some of the circuits. Having dimmer lights in the buildings towards the back enhances the illusion of distance.
I make foreground roads by gluing thin black foam sheets to 0.040” thick styrene, and then covering the foam with Durham’s water putty that has been tinted dark gray with acrylic craft paints. After the putty dries, I let the sheets bend and flex a little. This causes the putty to crack, and sometimes come off the foam in small chunks. The resulting cracks look incredibly real, because, well, they are real. The sidewalks are cast from spackling compound, and the stripes are automotive pin striping.
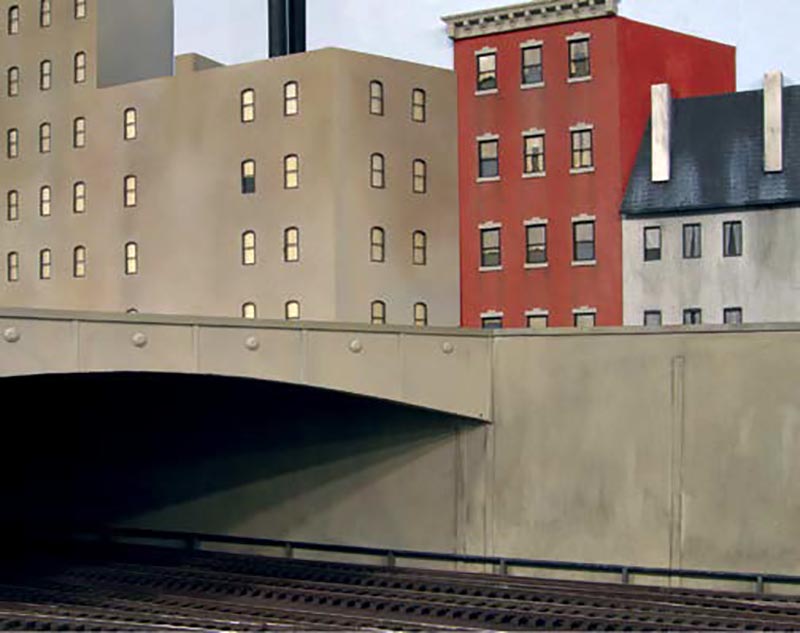
The author’s rendition of Edward Hoppers 1948 painting “Approaching a City.”
Artful Modeling
I admire the works of Edward Hopper, the American modern artist who often depicted railroads in his paintings. His painting “Approaching a City” inspired the scene in Photo 8. Sharp-eyed readers will also note the seeds for a few other Hopper works, including “Early Sunday Morning,” “New York Office” and “Drugstore.” In addition to emulating Hopper, I am trying to evoke images from famous Pennsylvania Railroad calendars such as Grif Teller’s “Dynamic Progress” for the 1956 edition.
Anyone who has driven on US Route 1 or taken the train has seen the Lower Trenton Bridge, also known as the “Trenton Makes, the World Takes” bridge. My version was created by kitbashing two MTH arch bridges, so much so that I had to embed square aluminum tubes in the base to provide the structural support. The letters, which light up just as on the prototype, are cut from Miller Engineering Electro-Luminescent sheets. (I know the real bridge is a highway bridge, but remember we are not “beholding” here.)
More Scenery Details
Automobiles are models of American cars built from 1950 to 1956. Anything older does not help define the era, even though they might be historically accurate. Anything newer is an anachronism. I try to find the dullest cars I can because there were not that many decked out convertibles or two-tone coupes in the mid 1950s. I have had luck repainting police cars or taxis in muted tones of gray, green, tan, or white. I do the same thing to turn a Chevy Bel-Air or Ford Victoria into their more pedestrian siblings like a 210 or Club Sedan.
Like many of us, I have thrown in the towel and use ¼3 scale cars. That’s just a concession to practicality. They don’t look that bad if they are confined to foreground scenes, but at least I want to make sure they are ¼3 scale. The “Classic Car Data Base” will give you dimensions of virtually every car ever made. If my models are more than 2 percent off, particularly in width and length, they go on to eBay. That 2% can make a real difference in cars parked side by side. For the record, every Franklin Mint, Vitesse, and Solido car I have purchased has been spot on. Solido and White Rose models are very easy to take apart and paint.
Right now my layout is a work in progress on virtually all fronts. The most glaring omission is the lack of overhead catenary. I hope to make good progress on that front and many others in 2011.